14.3.08

Get it right: Super shiny hair.


My handbag is full enough without having a mirror in it for touch ups. Why waste precious space when you can have silky, slinky hair so shiny you can see your reflection in it.


  • Use a shampoo and conditioner suited to your hair type. Stay away from volumising types as most do not promote smoother hair.


  • Make sure the hair cutlicle is open to maximise the effects of your conditioner. To achieve this, simply rinse out your shampoo with warm water.


  • Rinse your conditioner with lukewarm water, and as a final rinse, blast with ice cold water. It can be a pain, but it closes the hair cuticle, making the surface smoother and more light reflective.


  • When towel-drying, make sure you don't rub the hair or treat it roughly. Gently squeeze the moisture out of your hair, with a clean, soft towel.


  • Run a wide-toothed comb through your hair, starting at the bottom and working your way up.


  • Apply a thermal smoother, again, starting at the ends and working your way up to the roots. Redken All Soft Velvet Whip, 150mL for about $22.95 is a godsend for dry hair.


  • Let your hair air dry until it the hair is more dry than wet.


  • Section of your hair in manageable pieces with clips.


  • Blowdry your hair on a medium setting with a large, round barrel brush, preferably with a ceramic core.


  • Concentrate on the outer layers of the hair, taking care to point the nozzle of the hairdryer down the hair. This encourages the hair cuticle to stay flat.


  • Use a straigtening iron with solid non stick ceramic plates to glide over the lengths of the hair. If your the unlucky non-owner of the fantabulous ghd, hop on the bandwagon quick sticks.


  • Use the cool shot button on your hairdryer to lightly blast the hair. This sets the style.


  • If you wish, you can apply a serum or humidty protectant to really lock in the smooth feeling. John Frieda and Schwartzkopf Osis brand serums are top notch.


At the risk of sounding oh la la french, i wont do the whole voila flourish but..


Voila!


Hot hair.

9.2.08

Quicky- Icky nails.

Nails split, peeling, and showing signs of wear and tear? Sounds like your talons need a bit of tender loving care. A miracle cure for weak nails is Manicare Strength Extender, $11.99. Applied every 2 days, it strengthens and moisturises the nail plate, promoting flash nails in one measly week. Gotta love that!


**For a more long term solution, be sure to include plenty of protein and calcium in your diet.

5.2.08

New

Hi guys,

The new post of Faux Tanning is at the bottom of the page...can't figure out how to move it. Guess I'm better with mascara than computers!

xox

14.11.07

Get it right- Juicy lips.


High self esteem aside, let's face it, we all want to look like Angelina the Great. And while she has killer eyes, perfect bone structure and the rest, if I had my pick of one pair of lips, it would be hers.


They're so damn pouffy, pillowy, full, voluminous and soft I want to build a monument for them! Praise the lips!


Thankfully, for us lesser mortals, cheating our way to yummy lips is a cinch. Follow these steps:


  • Everyone has an old toothbrush lying around. Apply whatever moisturiser you have, body lotion, or even Vaseline generously to the lips, and gently brush lips in a circular motion. This exfolitates dead skin or rough patches. Alternatively, just use a damp washcloth.
  • Pat on a lip balm to soften lips. Can't go wrong with Blistex.

  • Take a neutral coloured lip liner and trace slighty above the lip line. Please dont go overboard, the shaky nanna lip is just too tragic for words.

  • Colour in your lips with the pencil, and as lip pencil tend to be quite drying, use one with something like almond oil or shea butter.

  • You can either pop some peachy-pink shimmery gloss, or a lipstick thats a shade or two darker than your natural lip colour, then dab clear gloss in the center of your bottom lip.

And hey, presto! Angelina Jolie without the tribe of kids.

13.11.07

Sorted: Brows

Q. How do I shape my eyebrows to suit my face shape? And is there a pain free way?

A. Good question. Cleanly shaped and defined brows give a groomed appearance to the face and the shape of them can significantly change the way you look. Face shapes are a factor in determining how to style your brows, but because face shapes are sometimes hard to determine by yourself, or can be a combination of 2 face shapes, the best thing to do is just keep to the natural line of your brows. I'd go to a reputable salon to get them done professionally the first time, and then you can maintain the brows by plucking new hairs. It costs between $12-$20 to get an eyebrow wax, depending on the work that has to be done. Be wary of letting the therapist do their thang... explain clearly what you want and dont want i.e. 'please dont leave me brow-less'. The genereal brow shape that suits most people is soft angled, with a rounded peak and tapered end.

The ouch factor depends on your pain threshold, and just a little lady tip for you, just before and during that time of the month, your pain threshold will be lower than normal, meaning ouchies feel more like #$%^&*!!!! Pluck your brows after a hot shower, as your pores will be open and more willing to be ripped of its follicles (!). If it all gets too much, apply a numbing gel like ye olde Bonjela. No pain, no gain, my prettys.

Invest in quality tools. Cash strapped? Manicare will sort you out.

12.11.07

Beauty Dilemma?

Got a burning beauty question just itching to be answered? Comment your query on this post and keep an eye out for Blushedbeautys answer..

Stay lovely x

9.11.07

Quickie: Stubby lashes

The eyes are the window to your soul, and thus deserve a pretty frame. Do your lashes need a pick-me-up? Or a full blown makeover? Never fear my woeful child, Blushed has the answer! Cure straight lashes with the holy grail of tools: an eyelash curler. Give the rubber cushions a blast with the hair dryer for longer lasting twirly lashes. Your eyes will be instantly bigger and brighter. Go a step further by applying a coat non-waterproof lengthening mascara, followed by a waterproof volumising one. Always use an eyelash comb between coats to get rid of any nasty clumps. Now you can head out in the big bad world knowing you have big bad lashes.

My tried and tested faves:

  • Revlon Luxurious Lengths Mascara, $19.95
  • Maybelline Intense XXL Waterproof Mascara, $17.95
  • Priceline eyelash curler, $6.95

**Tip**...Never spend much on mascara, 'cos the supermarket brands are just as good and even better than most high-end mascaras.

7.11.07

Get it right- Your perfect base.

Kiera Knightly knows that flawless skin is the key to love at first sight.


I read recently that the good ol' fashioned 'date' is becoming a thing of the past. In the article, the writer attempted to deconstruct the reasons as to why it's dying out... all of which were way off track. I alone know the truth. Dates aren't disappearing! What's vanishing is the concept of 1st, 2nd and 3rd base. Skip a base, and the relationship will, well, fade away. Similar parallels are found with achieving faultless-looking foundation.

♥1st base is the glue that makes you want to stick together forever; that kiss. In makeup world, we call this glue 'primer'. Thankfully of a pleasanter consistency than actual adhesive (I'm exaggerating slightly with the word 'glue'), primer helps to smooth the skins' surface and prolong the wear of your makeup. Apply after your usual moisturiser has sunk in.
♥2nd base is that first 'I love you'. You love your foundation, so treat it well. Keep germies out of the bottle by always using freshly washed hands when handling. Use it sparingly, dotting it around your face and blending. You may use a sponge, brush or your fingertips, but if you use a tool, make sure to warm the foundation first by pouring a bit to the back of your hand.

♥3rd base is your special secret. Keep blemishes a secret from your admirer with the greatest tool ever: concealer! For under eye circles, use a liquid concealer with light reflecting properties to blur fine lines and brighten. For scars or pimples, stick concealers offer the coverage you need. Apply with a light hand, in a shade that perfectly matches your skin tone. Use a good quality concealer brush for an expert finish.

Et voila! Fall in love with your new flawless skin... a love affair sans the messy breakup.
Stick to clever buys like:
  • Max Factor Flawless Perfection, around $34, comes with foundation and primer.
  • ModelCo FLUIDSPLASH 3-in-1 Foundation, $58, is a foundation, concealer and eye base in one nifty product.

Tried and tested:

  • Cant go past the kids at M.A.C, Select Cover-up concealer, $32 is the best concealer I've found for both dark circles and blemishes.
  • If you prefer the thicker consistancy of a stick concealer, go for L'oreal Paris Ideal Balance concealer, $24.95.
  • Rimmel Recover Perfect Skin Primers in Perfecting Veil, $9.95 is a cheapie but goodie that covers your skin in neutral colour, smoothing the surface and lessening the amount of foundation you need to get good coverage.
  • The Body Shop Lipstick/Concealer Brush, $12.95 is ideal for blending.

4.11.07

Quickie: Red spots.

Scary red blemish popped up 2 minutes before a big date? Grab your regular eyedrops, apply to the spot and brush on a skin-toned concealer. Dust on some powder and its bye-bye pimples, hello clear-looking skin.

Try:


  • Visine Advanced Relief Eye Drops, 15ml $9.99

  • Mac Select Cover-Up, $32

  • Rimmel Stay Matte Pressed Powder, $11.95

3.11.07

How to: Faux your tan.

While orange is one of my favourite colours: think fanta, goldfishies and tangerine Haivainas, I dont quite enjoy the nasty, blotchy look of a NQR (read: not quite right) tan job. I think to myself, why, why, why do girls put up with icky shades and streaky results? Dont worry, I'm not just going to complain about it, I've created an action plan to cure bronzing woes. My current tan envy is the always gorgeous Aussie supermodel Miranda Kerr (left).


There are a few things you must do in prep for your tanning:

  • Moisturise really well the night before, to allow the oils in your moisturiser to sink in properly. Otherwise, it's hello patches. There are tonnes of cheap and cheerful body moisturisers, but my favourite is Palmer's Cocoa Butter Formula Skin Smoothing Lotion, 250mL, $7.95. It has the added benefit of Alpha Beta Hydroxy which acts as an exfoliant to get rid of dead skin cells, plus vitamin E and shea butter for blissfully touchable skin. Smooth sailings ahead!

  • It's best to start the actual tanning application in the evening, preferably a good 2 hours before you hit your pillows. That way, there's time for the tan to dry properly, and you'll wake with an enviable Tahitian glow.

  • EXFOLIATE! I hope you havn't heard this here first, 'cause this is the most crucial step in achieving a perfect tan! Just hop in the shower, run the water at a tepid temperature and apply the product allover the skin with firm circular motions. I like to slough down with a sugar formula like Garnier Bodytonic Sugar Scrub, 150mL, around $12 . It has a divine citrus fragrance, adding a pleasure factor to your boring shower routine. Pay heed to the heels, elbows and knees, as these area tend to be rougher than others. Also, grab your usual facial scrub and gently massage onto your neck and decollotage. It is very important that no residue is left on the skin, so rinse, rinse, rinse! Try not to use products which contain oils, as these will definitely leave unwanted residue.
  • I'd advise that you shave or wax the day before, so your skin has time to settle any irritation.
  • After showering, dry your skin completely, and if your bathroom is steamy, get out of there straight away. Sweat will interfere with your self-tanner.

  • DO NOT use any perfume or antiperspirent.
  • Apply a rich moisturiser such as Norwegian Formula Body Moisturiser, 300mL, $9.64 lightly to your elbows, inside your wrists, knees and ankles.


Still breathing? Now that you've prepped your skin for tanning application, lets get into it:

  1. First assess what type of self-tanner you have. Is it a mousse, gel, lotion or spray? Either of these are fine, though oily skins should use gels and dry skins should stay away from sprays unless they have moisturising properties. I recommend a tinted formulation, so that you don't end up with missed spots.

  2. Strip butt naked. You can wear underwear if you're not concerned about tanning your hips and bum.

  3. Apply the self-tan from the feet up. Apply sparingly on the toes, the back of the heels and the ankles. Work your way up the legs, rubbing in the tan to prevent streaking. Careful around the knees, as they tend to slurp up the tan very easily. If your having trouble with a spray tanner reaching the back of your legs, get a friend or partner to lend you a hand. Same goes for your back.

  4. After making sure your body is evenly covered, the waiting game starts. Try not to put on any clothes for about an hour. Now is not the time to be vaccuuming the lounge or ripping through your secret Jane Fonda exercise tapes, just try and keep cool.

Depending on the formulation your tan should have developed between 1-6 hours after application. Basically, no matter what the bottle says, the tanning time will vary depending on the humidity in the air. You may take a shower the day after, though if possible, use a PH balanced body wash such as Johnson's 24hour Moisture Body Wash, 400mL, $5.99.


Do make body lotion your new best friend, as it will extend the duration of your faux glow. Have a bit of fun with shimmery lotions that light up your newly bronzed canvas. Napoleon Perdis Whipped Dream Tan Enhancer, 250g, $35 has the added goodie of a little self tan, so, when used daily, will give you a super long-lasting luminous tan. Whats not to love?!

Unfortunately for us, a great colour on one person can be totally awful on another, as the end result really does rely on your technique, skin tone and your skins moisture. Usually if the colour is too pale, a second coat will do the trick.

Just Blooming

Hello my lovely beauty devotees and welcome to Blushed! This little baby is the brainchild spawned from my many hungry years of devouring the beauty pages of every magazine big and small. Blush, being in my opinion, the sexiest adornment a girl can prettify herself with, won the honorable, er, honor of being not only the title but the first post for my blog.


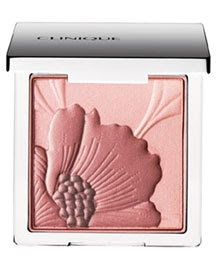
So! During a stroll through a highly tempting cosmetic department, I found myself daydreaming of pretty pinky-peach flowers. The source of my musing? Clinique Fresh Bloom Allover Colour, 9g, $59 (pictured right, in Peony) comes in 4 fresh and luminous shades: Posy, Peony, Plum Poppy and Almond Blossom. Not strictly a blush, it can be applied allover the face for a subtle glow or sculpted as a cheekbone highlighter. Heck, attach a card and post it to youself, because this bloom sure beats cellophane wrapped carnations.